یک پروژه ساده با استفاده از NDK (آموزش)

سلام. همه ما می دونیم امنیت اپلیکیشن، یکی از مهمترین چیزهایی هست که باید همیشه مورد توجه قرار بگیره. خیلی از راهکارها باید از سمت سرور هندل بشه ولی در سمت کلاینت هم میشه یه کارایی کرد که مهمترین اونها پنهان کردن api هاست. obfuscate کردن پروژه یکی از این راهکارهاست. البته با decompile کردن پروژه ، تقریبا راحت میشه به API ها دست پیدا کرد. اینجاست که میشه از NDK کمک گرفت. متن زیر رو بخونید :
The Android Native Devlopment Kit (NDK) allows you to write code in C/C++, and can be very useful when you’re trying to hide things like API keys. The good news is that NDK libraries can’t be decompiled making the information harder to find. The NDK compiled code can still be opened with a hexidecimal editor but by the nature of the API key they are harder to pick out in a hexidecimal editor.
البته همونطور که ذکر شده، این داستان فرایند دیکامپایل کردن رو سخت تر میکنه و در نوع خودش بدرد بخوره.
خب بریم سراغ آموزش استفاده از NDK در برنامه (در ANDROID STUDIO ) :
1- دانلود ndk
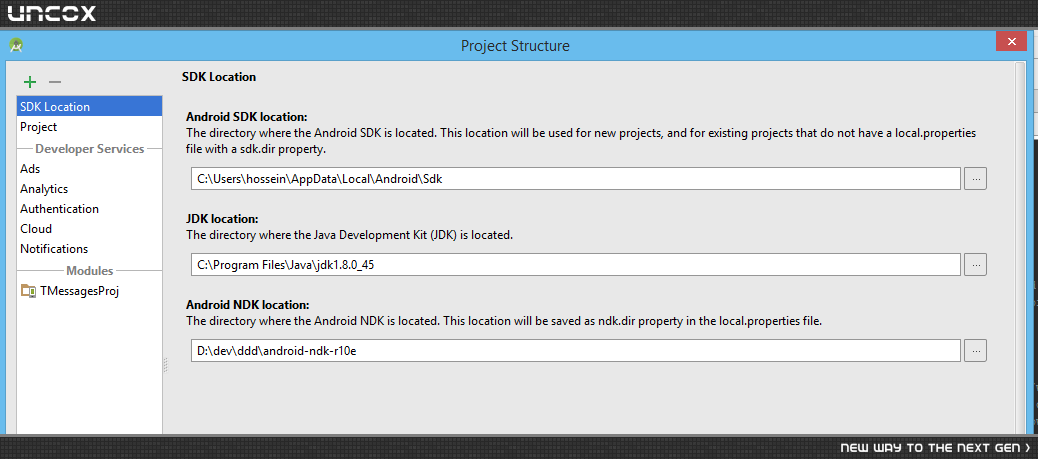
2-شناساندن ndk به اندروید استودیو ( شکل زیر ) :
3- یک پوشه بنام jni داخل app بسازید.
4- رفتن به مسیر 'Settings > Tools > External Tools' و شکل زیر :

که البته مسیر ها رو متناسب با پروژتون تغییر بدید.
5- یک کلاس بنام HelloJni بسازید با محتوای زیر :
public class HelloJni{
static {
System.loadLibrary("Test");
    }

public native String stringFromJNI();

}
6- روی کلاس ساخته شده راست کلیک کرده و مطابق شکل زیر عمل کنید :
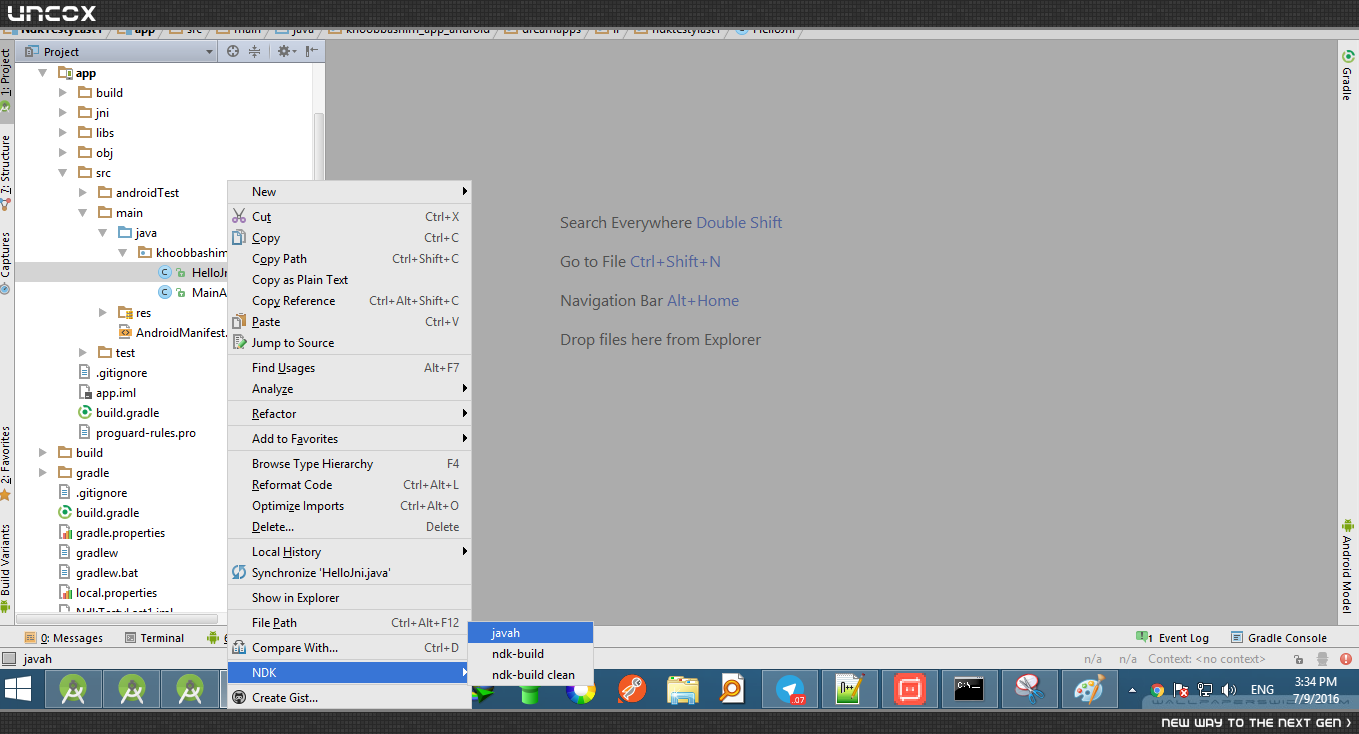
حالا یک فایل با پسوند h. توی پوشه jni تون ساخته میشه که داخلشیه چیزی شبیه این کده :
#include <jni.h>

#ifndef _Included_pakageName_projectName_HelloJni
#define _Included_pakageName_projectName_HelloJni
#ifdef __cplusplus
extern "C" {
#endif

JNIEXPORT jstring JNICALL Java_pakageName_projectName_HelloJni_stringFromJNI
  (JNIEnv *, jobject);

#ifdef __cplusplus
}
#endif
#endi
حالا یه فایل با پسوند cpp کنارش بسازید (مثلا Test.cpp) با این کد :
#include "pakageName_projectName_HelloJni.h"

JNIEXPORT jstring JNICALL Java_khoobbashim_1app_1android_dreamapps_ir_ndktestylast1_HelloJni_stringFromJNI
  (JNIEnv* env, jobject){

          return env->NewStringUTF("http://someUrl.ir");
}
خب حالا دوتا فایل بنام های android.mk و appliocation.mk توی پوشه JNI بسازید با محتواهای زیر :
برای ANDROID.MK :
LOCAL_PATH := $(call my-dir)

include $(CLEAR_VARS)

LOCAL_MODULE := Test
LOCAL_SRC_FILES := Test.cpp
include $(BUILD_SHARED_LIBRARY)
و برای Application.mk :
APP_MODULES := Test

APP_ABI := all
خب . حالا وقت build کردن پروژه ست . قبل از این کار برید توی environment variables و مسیر ndk رو به path اضافه کنید. سپس به
دایرکتوری app توی پروژه برید و اونجا command prompt رو بالا بیارید ( شیفت رو نگه دارید و open command window here رو انتخاب کنید ) و دستور
build-ndk رو اجرا کنید. اگر بدون خطا اجرا بشه پوشه libs حاوی فایل های so خواهد شد.
توی mainActivity هم کدهای زیر رو کپی کنید :
public class MainActivity extends AppCompatActivity {

@Override
protected void onCreate(Bundle savedInstanceState) {
super.onCreate(savedInstanceState);
setContentView(R.layout.activity_main);

HelloJni helloJni = new HelloJni();

Log.i("LOG",helloJni.stringFromJNI());
    }
}
حالا با اجرای برنامه متن http://someUrl.ir رو توی logCat مشاهده می کنید. شما میتونید تمام api هاتون رو بدین شکل توی برنامه استفاده کنید.
توضیحاتی در مورد android.mk :
-Android.mk glues your C and C++ source files to the Android NDK.
-describes your sources and shared libraries to the build system.
-The Android.mk file is useful for defining project-wide settings that Application.mk, the build system, and your environment variables leave undefined. It can also override project-wide settings for specific modules.
-The syntax of the Android.mk allows you to group your sources into modules. A module is either a static library, a shared library, or a standalone executable. You can define one or more modules in each Android.mk file, and you can use the same source file in multiple modules.
-you don't need to list header files or explicit dependencies between generated files in your Android.mk file. The NDK build system computes these relationships automatically for you. As a result, you should be able to benefit from new toolchain/platform support in future NDK releases without having to touch your Android.mk file.
Basics :
An Android.mk file must begin by defining the LOCAL_PATH variable:
LOCAL_PATH := $(call my-dir)
This variable indicates the location of the source files in the development tree. Here, the macro function my-dir, provided by the build system, returns the path of the current directory (the directory containing the Android.mk file itself).
—----------------------------------------------------------------------------------------------------------
The next line declares the CLEAR_VARS variable, whose value the build system provides.
include $(CLEAR_VARS)
The CLEAR_VARS variable points to a special GNU Makefile that clears many LOCAL_XXX variables for you, such as LOCAL_MODULE, LOCAL_SRC_FILES, and LOCAL_STATIC_LIBRARIES. Note that it does not clear LOCAL_PATH. This variable must retain its value because the system parses all build control files in a single GNU Make execution context where all variables are global. You must (re-)declare this variable before describing each module.
—---------------------------------------------------------------------------------------------------------
Next, the LOCAL_MODULE variable stores the name of the module that you wish to build. Use this variable once per module in your application.
LOCAL_MODULE := hello-jni
—----------------------------------------------------------------------------------------------------------
The next line enumerates the source files, with spaces delimiting multiple files:
LOCAL_SRC_FILES := hello-jni.c
—----------------------------------------------------------------------------------------------------------The last line helps the system tie everything together:
include $(BUILD_SHARED_LIBRARY)
The BUILD_SHARED_LIBRARY variable points to a GNU Makefile script that collects all the information you defined in LOCAL_XXX variables since the most recent include. This script determines what to build, and how to do it.
پاسخگویی و مشاهده پاسخ های این سوال تنها برای اعضای ویژه سایت امکان پذیر است .
چنانچه تمایل دارید به همه بخش ها دسترسی داشته باشید میتوانید از این بخش لایسنس این آموزش را خریداری نمایید .
حقوق مادی و معنوی تمامی آثار و محتویات عرضه شده در این وب سایت، متعلق به شرکت «فوژان رسانه ایده هوشمند» و پدیدآورندگان آثار بوده و حسب مورد دارای مجوز از مراجع ذی صلاح می باشد.
کپی برداری از مطالب این سایت حتی با ذکر منبع جایز نیست.