


یک سرویس هواشناسی ساده

سلام دوستان
میخوام یه سرویس آب و هوا رو بنویسم که بعضی از قسمت ها رو در زیر کدش رو آوردم و برای درک بهتر پروژه تجربیات شما قطعا مفیده
کدهای لازم برای سرویس هواشناسی
 package com.allmycode.services;


import android.app.Service;
import android.content.Intent;
import android.os.IBinder;
import android.widget.Toast;

public class MyWeatherService extends Service {

    @Override
    public IBinder onBind(Intent intent) {
        Toast.makeText(this, R.string.service_bound,
                       Toast.LENGTH_SHORT).show();
        System.out.println("onBindCalled");
        return null;
    }

    @Override
    public int onStartCommand(Intent intent,
                              int flags, int startId) {
        Toast.makeText(this, R.string.service_started,
                       Toast.LENGTH_SHORT).show();
        System.out.println("onStartCommandCalled");

        return START_STICKY;
    }

    @Override
    public void onDestroy() {
        Toast.makeText(this, R.string.service_destroyed,
                       Toast.LENGTH_SHORT).show();
    }
}


کد کاملتر
 package com.allmycode.services;


import android.app.Service;

import android.content.Intent;

import android.os.Bundle;

import android.os.Handler;

import android.os.IBinder;

import android.os.Message;

import android.os.Messenger;

import android.os.RemoteException;

public class MyWeatherService extends Service {

  Messenger messengerToClient = null;


  MyIncomingHandler myIncomingHandler =
      new MyIncomingHandler();

 Messenger messengerToService =
      new Messenger(myIncomingHandler);


  @Override
  public IBinder onBind(Intent intent) {
    return messengerToService.getBinder();

  }

  class MyIncomingHandler extends Handler {
    @Override

  public void handleMessage(Message incomingMessage) {
      messengerToClient = incomingMessage.replyTo;


     Bundle reply = new Bundle();
      reply.putString("weather", "It's dark at night.");

    Message replyMessage = Message.obtain();
      replyMessage.setData(reply);

    try {
        messengerToClient.send(replyMessage);

     } catch (RemoteException e) {
        e.printStackTrace();
      }
    }
  }
}
یک کلاینت برای سرویس هواشناسی
 package com.allmycode.demos;


import android.app.Activity;

import android.content.Intent;

import android.os.Bundle;

import android.view.View;


public class ServiceConsumerActivity extends Activity {

  Intent intent = new Intent();


    @Override

  public void onCreate(Bundle savedInstanceState) {

       super.onCreate(savedInstanceState);

   setContentView(R.layout.main);

  intent.setAction("com.allmycode.WEATHER");

   }


 public void onStartClick(View view) {

	System.out.println("onStart called");

     startService(intent);

  }


 public void onStopClick(View view) {

    stopService(intent);

  }
}
پیکر بندی
 WeatherConfig config = new WeatherConfig();
config.unitSystem = WeatherConfig.UNIT_SYSTEM.M;
config.lang = "en"; // If you want to use english
config.maxResult = 5; // Max number of cities retrieved
config.numDays = 6; // Max num of days in the forecast


client.updateWeatherConfig(config);


IWeatherProvider provider = null;
try {
    //provider = WeatherProviderFactory.createProvider(new YahooProviderType(), config);
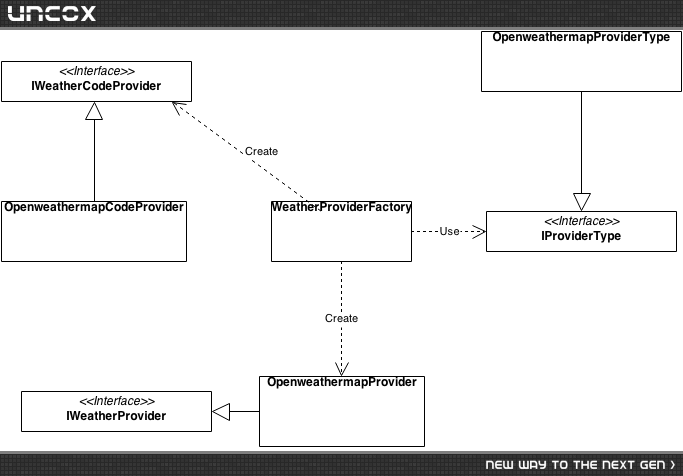
    provider = WeatherProviderFactory.createProvider(new OpenweathermapProviderType(), config);
    //provider = WeatherProviderFactory.createProvider(new WeatherUndergroundProviderType(), config);
    client.setProvider(provider);
}
catch (Throwable t) {
    // There's a problem
}
سرچ برای ای دی شهر
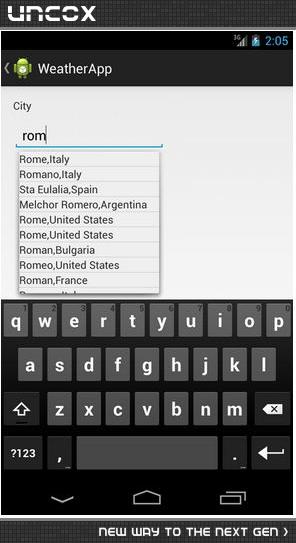
 private void search(String pattern) {
    client.searchCity(pattern, new WeatherClient.CityEventListener() {
        @Override
        public void onCityListRetrieved(List<City> cityList) {
           // When the data is ready you can implement your logic here
        }

        @Override
        public void onWeatherError(WeatherLibException t) {
           // Error
        }

        @Override
        public void onConnectionError(Throwable t) {
           // Connection error
        }
    });
}
جستجو با استفاده از مختصات جغرافیایی
 client.searchCityByLocation(WeatherClient.createDefaultCriteria(), new WeatherClient.CityEventListener() {

     @Override
     public void onCityListRetrieved(List<City> cityList) {
        // Here your logic when the data is available
     }

     @Override
     public void onWeatherError(WeatherLibException wle) {

     }

     @Override
     public void onConnectionError(Throwable t) {

     }
 });
}
catch(LocationProviderNotFoundException lpnfe) {

}
Current Weather condition
 client.getCurrentCondition(cityId, new WeatherClient.WeatherEventListener() {
    @Override
    public void onWeatherRetrieved(CurrentWeather weather) {
       // Here we can use the weather information to upadte the view
    }

    @Override
    public void onWeatherError(WeatherLibException t) {

    }

    @Override
    public void onConnectionError(Throwable t) {

    }
});
WeatherForecast and Hourly WeatherForecast
 client.getForecastWeather(cityId, new WeatherClient.ForecastWeatherEventListener() {
    @Override
    public void onWeatherRetrieved(WeatherForecast forecast) {
        updateView(forecast);
    }

    @Override
    public void onWeatherError(WeatherLibException t) {

    }

    @Override
    public void onConnectionError(Throwable t) {
        //WeatherDialog.createErrorDialog("Error parsing data. Please try again", MainActivity.this);
    }
});
for the hourly forecast we have
 client.getHourForecastWeather(cityId, new WeatherClient.HourForecastWeatherEventListener() {
    @Override
    public void onWeatherRetrieved(WeatherHourForecast forecast) {
        updateView(foreacst);
    }

    @Override
    public void onWeatherError(WeatherLibException wle) {

    }

    @Override
    public void onConnectionError(Throwable t) {

    }
});
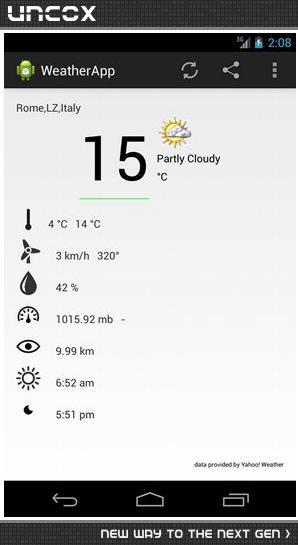
XML
 private static Weather parseResponse (String resp, Weather result) {
    Log.d("SwA", "Response ["+resp+"]");
    try {
        XmlPullParser parser = XmlPullParserFactory.newInstance().newPullParser();
        parser.setInput(new StringReader(resp));

        String tagName = null;
        String currentTag = null;

        int event = parser.getEventType();
        boolean isFirstDayForecast = true;
        while (event != XmlPullParser.END_DOCUMENT) {
            tagName = parser.getName();

            if (event == XmlPullParser.START_TAG) {
                if (tagName.equals("yweather:wind")) {
                    ...
                }
                else if (tagName.equals("yweather:atmosphere")) {
                    ...
                }
                else if (tagName.equals("yweather:forecast")) {
                    ...
                }
                else if (tagName.equals("yweather:condition")) {
                    ...
               }
                else if (tagName.equals("yweather:units")) {
                   ...
                }
                else if (tagName.equals("yweather:location")) {
                    ...
                }
                else if (tagName.equals("image"))
                    currentTag = "image";
                else if (tagName.equals("url")) {
                    if (currentTag == null) {
                        result.imageUrl = parser.getAttributeValue(null, "src");
                    }
                }
                else if (tagName.equals("lastBuildDate")) {
                   currentTag="update";
                }
                else if (tagName.equals("yweather:astronomy")) {
                ...
             }

            }
            else if (event == XmlPullParser.END_TAG) {
                if ("image".equals(currentTag)) {
                   currentTag = null;
                }
            }
            else if (event == XmlPullParser.TEXT) {
                if ("update".equals(currentTag))
                    result.lastUpdate = parser.getText();
            }
            event = parser.next();
        }

    }
    catch(Throwable t) {
        t.printStackTrace();
    }

    return result;
}
App navigation and ActionBar
 <menu xmlns:android="http://schemas.android.com/apk/res/android"
    xmlns:app="http://schemas.android.com/apk/res-auto"
    xmlns:tools="http://schemas.android.com/tools"
    tools:context="com.survivingwithandroid.weather.MainActivity" >

    <item android:id="@+id/action_donate"
        android:title="@string/action_donate"
        android:orderInCategory="100"
        app:showAsAction="never"
        android:icon="@android:drawable/ic_menu_manage"/>

    <item android:id="@+id/action_settings"
        android:title="@string/action_settings"
        android:orderInCategory="100"
        app:showAsAction="never"
        android:icon="@android:drawable/ic_menu_manage"/>

    <item android:id="@+id/action_refresh"
        android:title="@string/action_refresh"
        android:orderInCategory="50"
        android:icon="@drawable/ic_menu_refresh"
        android:showAsAction="ifRoom"/>

    <item android:id="@+id/action_share"
        android:title="@string/action_share"
        android:orderInCategory="50"
        android:icon="@android:drawable/ic_menu_share"
        android:showAsAction="ifRoom"/>


</menu>
MainActivity
 @Override
public boolean onCreateOptionsMenu(Menu menu) {
    // Inflate the menu; this adds items to the action bar if it is present.
    getMenuInflater().inflate(R.menu.main, menu);
    return true;
}

@Override
public boolean onOptionsItemSelected(MenuItem item) {

    int id = item.getItemId();
    if (id == R.id.action_settings) {
        Intent i = new Intent();
        i.setClass(this, WeatherPreferenceActivity.class);
        startActivity(i);
    }
    else if (id == R.id.action_refresh) {
        refreshItem = item;
        refreshData();
    }
    else if (id == R.id.action_share) {
        String playStoreLink = "https://play.google.com/store/apps/details?id=" +
                getPackageName();

        String msg = getResources().getString(R.string.share_msg) + playStoreLink;
        Intent sendIntent = new Intent();
        sendIntent.setAction(Intent.ACTION_SEND);
        sendIntent.putExtra(Intent.EXTRA_TEXT, msg);
        sendIntent.setType("text/plain");
        startActivity(sendIntent);
    }
    else if (id == R.id.action_donate) {
        SwABillingUtil.showDonateDialog(this, mHelper, this);
    }
    return super.onOptionsItemSelected(item);
}


هدفم از این تاپیک اینه که یه بر نامه آب و هوا و به عبارتی یه سرویس هواشناسی ساده نوشته بشه . حالا ممکنه شما یکی بنویسه یه دوست دیگه یکی دیگه بنویسه و ... ومن هم یه برنامه بنویسم و حتی ممکنه مال شما بهتر از مال من بشه اما این برام مهم نیست . چیزی که مهمه اینه که در آخر بتونم این برنامه رو بنویسم البته تا قبل از شروع ترم جدید . چون به سلامتی دوستان ارشد قبول شدم و خیلی وقت ندارم و باید پیگیر کارای ثبت نام و ... بشم .
واسه نوشتن یه سرویس آب و هوا اول لازمه که توصیف کنیم که چطور میتونیم یه برنامه هواشناسی بنویسیم که بتونه اطلاعات آب و هوا رو به صورت صحیح دریافت کنه .
از ضروریات برنامه یکی اینه ه برنامه باید با سرویس HTTP اتصال برقرار کنه و به عبارتی کانکت بشه تا اطلاعات لازم آب و هوا رو بگیره. برا انجام این کار ما به یه سرویس دهنده در این مورد احتیاج داریم که بتونه با توجه به مشخصات فعلی مکان مورد نظر که به لحاظ جغرافیایی و از روی جی پی اس دریافت میکنه هواشناسی رو اعلام کنه که در این مورد سرویس های رایگان وجود دارند و ما هم طبیعتا از اونا استفاده می کنیم ( مثل : یاهو و openweathermap ) و اگر اشتباه نکنم این سرویس ها معمولا با API ارتباط برقرار می کنند.
اطلاعات آب و هوای کنونی - درخواست HTTP و پاسخ JSON
openweathermap چندین API ارائه میده تا استفاده کنیم و بتونیم اطلاعات آب و هوا رو بگیریم . و ما میخوایم از یکی از اونا استفاده کنیم که اطلاعات آب و هوای کنونی رو دریافت کنیم . برای دریافت این اطلاعات باید با آدرس زیر ارتباط برقرار کنیم و به عبارتی تماس بگیریم :
http://api.openweathermap.org/data/2.5/weather?q=city,country
اما این سرویس متاسفانه یه ایراد داره و اونم اینه که با ip ایران ناسازگاره . و قند شکن لازمه . از طرفی لازمه برای استفاده از امکانات سرویس ما تو سایت عضو بشیم . با این حال تا اونجایی که من تو گوگل گشتم یکی از بهترین ها ست.
حالا فرض کنید ما آب و هوای تهران رو میخوایم کافیه به جای سیتی =تهران و به جای کانتری=ایران رو بنویسیم یعنی مقدار q رو به صورت زیر تغییر بدیم :
q=tehran,iran
میتونیم آدرس رو کپی و در مرورگر پیست کنیم تا نتیجه رو مشاهده کنیم .
پاسخ JSON . فرمت پاسخی که داریم ( البته بر اساس شهر رم ایتالیا) :
 {
  "coord":{"lon":12.4958,"lat":41.903},
  "sys":{"country":"Italy","sunrise":1369107818,"sunset":1369160979},
  "weather":[{
        "id":802,"main":"Clouds","description":"scattered clouds",
         "icon":"03d"}],
   "base":"global stations",
   "main":{
           "temp":290.38,
           "humidity":68,
           "pressure":1015,
           "temp_min":287.04,
           "temp_max":293.71},
    "wind":{
           "speed":1.75,
           "deg":290.002},
    "clouds":{"all":32},
    "dt":1369122932,
    "id":3169070,
    "name":"Rome",
    "cod":200
}
بنابراین اولین کاری که ما باید انجام دهیم ایجاد مدل داده است . به طوری که بتونیم پاسخ رو تجزیه و تبدیل به کلاس های جاوا کنیم .اما این آنالیز و تجزیه و تبدیل متفاوت از تگ های main ای است که ما در کلاس جاوا استفاده می کنیم .
مدل رابطه ای :
coord : object
sys : object
weather : array
main : object
wind : object
name: String
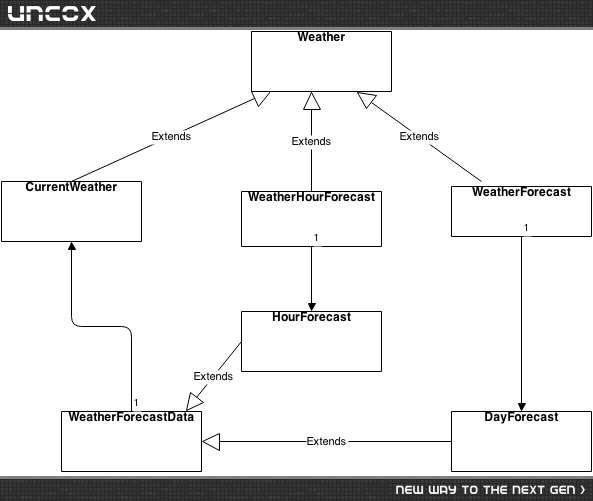
نمودار کلاس UML در زیر نشان داده شده است .
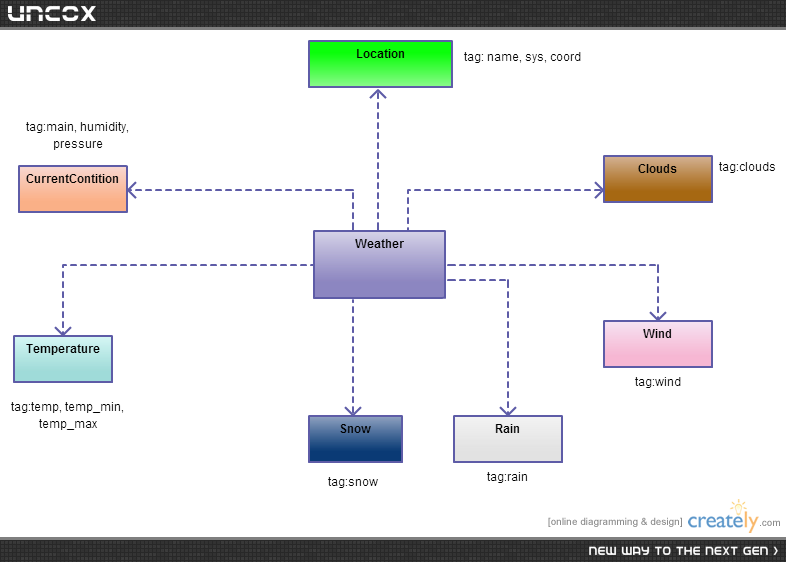
JSON تجزیه کننده هوا
وقتی ما مدل رو درست می کنیم باید اون رو تجزیه کنیم . برای این کار ما میتونیم یه کلاس خاص ایجاد کنیم که این کار رو انجوم بده .
اول از همه ما یه شی ایجاد می کنیم که ورودی اون همه پاسخ های json باشه و به عبارتی همه پاسخ های json رو از ورودی بگیره :
 // We create out JSONObject from the data
JSONObject jObj = new JSONObject(data);
در مرحله بعد ما شروع می کنیم به تجزیه هر قسمت از پاسخ های JSON :
Location loc = new Location();
JSONObject coordObj = getObject("coord", jObj);
loc.setLatitude(getFloat("lat", coordObj));
loc.setLongitude(getFloat("lon", coordObj));
JSONObject sysObj = getObject("sys", jObj);
loc.setCountry(getString("country", sysObj));
loc.setSunrise(getInt("sunrise", sysObj));
loc.setSunset(getInt("sunset", sysObj));
loc.setCity(getString("name", jObj));
weather.location = loc;
در خط 2 و 5 ما در واقع دو زیر شی ایجاد نمودیم (coordObj و sysObj )
برای گرفتن رشته ها ما از یه سری متود کمک میگیریم به صورت زیر :
 private static JSONObject getObject(String tagName, JSONObject jObj)  throws JSONException {
    JSONObject subObj = jObj.getJSONObject(tagName);
    return subObj;
}

private static String getString(String tagName, JSONObject jObj) throws JSONException {
    return jObj.getString(tagName);
}

private static float  getFloat(String tagName, JSONObject jObj) throws JSONException {
    return (float) jObj.getDouble(tagName);
}

private static int  getInt(String tagName, JSONObject jObj) throws JSONException {
    return jObj.getInt(tagName);
}
پاسخگویی و مشاهده پاسخ های این سوال تنها برای اعضای ویژه سایت امکان پذیر است .
چنانچه تمایل دارید به همه بخش ها دسترسی داشته باشید میتوانید از این بخش لایسنس این آموزش را خریداری نمایید .
