


طریقه ساخت dialog شبیه آیفون
مدیریت گفتگو
 124847
8 سال پیش
124847
8 سال پیش
با عرض سلام خدمت اعضا محترم UNCOX میخواستم طریقه ی ساخت dialog شبیه آیفون رو بهتون بگم امیدوارم دوست داشته باشین و مفید واقع بشه
یک لایه ی مخصوص برای دیالوگ خودتون بسازید من لایه خودم رو اینطور طراحی کردم
<?xml version="1.0" encoding="utf-8"?>
<LinearLayout xmlns:android="http://schemas.android.com/apk/res/android"
    android:layout_width="match_parent"
    android:layout_height="match_parent"
    android:gravity="center"
    android:orientation="vertical">


    <LinearLayout
        android:layout_width="match_parent"
        android:layout_height="wrap_content"
        android:layout_marginLeft="20dp"
        android:layout_marginRight="20dp"
        android:background="@drawable/background"
        android:orientation="vertical">

        <TextView
            android:layout_width="match_parent"
            android:layout_height="wrap_content"
            android:layout_marginTop="10dp"
            android:gravity="center"
            android:text="Cellular Data is Turned Off"
            android:textColor="@color/textColor"
            android:textSize="20dp" />

        <TextView
            android:layout_width="match_parent"
            android:layout_height="wrap_content"
            android:gravity="center"
            android:text="Turn on cellular or use Wi-Fi to access data."
            android:textColor="@color/textColor"
            android:paddingLeft="10dp"
            android:paddingRight="10dp"
            android:textSize="15dp" />

        <View
            android:layout_width="match_parent"
            android:layout_height="0.25dp"
            android:layout_marginTop="10dp"
            android:background="@color/khatColor" />


        <LinearLayout
            android:layout_width="match_parent"
            android:layout_height="45dp"
            android:orientation="horizontal">


            <Button
                android:id="@+id/btnSetting"
                android:text="Settings"
                android:textAllCaps="false"
                android:layout_width="0dp"
                android:layout_height="match_parent"
                android:layout_weight="0.5"
                android:textSize="18dp"
                android:background="@drawable/btn_left"
                android:textColor="@color/btnColor"/>


            <View
                android:layout_width="0.25dp"
                android:layout_height="match_parent"
                android:background="@color/khatColor" />


            <Button
                android:id="@+id/btnOK"
                android:text="OK"
                android:textSize="18dp"
                android:layout_width="0dp"
                android:layout_height="match_parent"
                android:layout_weight="0.5"
                android:background="@drawable/btn_right"
                android:textColor="@color/btnColor"/>


        </LinearLayout>

    </LinearLayout>


</LinearLayout>
و بک گراندهایی هم که برای عناصر موجود در لایه طراحی کردم به این شکل هستن
بک گراند لایه اصلی
<?xml version="1.0" encoding="utf-8"?>
<shape xmlns:android="http://schemas.android.com/apk/res/android">

    <solid android:color="@color/CcolorBackground"/>
    <corners android:radius="15dp"/>

</shape>
بک گراند دکمه OK
<?xml version="1.0" encoding="utf-8"?>


<selector xmlns:android="http://schemas.android.com/apk/res/android">


    <item android:state_pressed="false">


        <shape xmlns:android="http://schemas.android.com/apk/res/android">

            <solid android:color="@android:color/transparent"/>
            <corners android:bottomRightRadius="15dp"/>


        </shape>


    </item>


    <item android:state_pressed="true">


        <shape xmlns:android="http://schemas.android.com/apk/res/android">

            <solid android:color="@color/btnPressed"/>
            <corners android:bottomRightRadius="15dp"/>


        </shape>


    </item>


</selector>
بک گراند دکمه Setting
<?xml version="1.0" encoding="utf-8"?>


<selector xmlns:android="http://schemas.android.com/apk/res/android">


    <item android:state_pressed="false">


        <shape xmlns:android="http://schemas.android.com/apk/res/android">

            <solid android:color="@android:color/transparent"/>
            <corners android:bottomLeftRadius="15dp"/>


        </shape>


    </item>


    <item android:state_pressed="true">


        <shape xmlns:android="http://schemas.android.com/apk/res/android">

            <solid android:color="@color/btnPressed"/>
            <corners android:bottomLeftRadius="15dp"/>


        </shape>


    </item>


</selector>
کدهای رنگی هم که توی برنامه استفاده کردم به این شکلن
<color name="CcolorBackground">#F9F9F9</color>
<color name="btnPressed">#EAEAEA</color>
<color name="btnColor">#0977FA</color>
<color name="textColor">#010101</color>
<color name="khatColor">#D5D5D5</color>
حالا میخوام انیمیشن های اومدن و رفتن دیالوگ رو هم عوض کنیم ابتدا 2 تا انیمیشن یکی برای اومدن و دیگری برای رفتن بسازید..انیمیشن هایی که من ساختن این شکلی هستن:
animation come:
------------------
<?xml version="1.0" encoding="utf-8"?>
<set xmlns:android="http://schemas.android.com/apk/res/android">

    <scale android:fromXScale="1.1" android:fromYScale="1.1" android:toXScale="1" android:toYScale="1" android:pivotX="50%" android:pivotY="50%"
        android:duration="200"/>

    <alpha android:fromAlpha="0" android:toAlpha="1" android:duration="100"/>


</set>

animation go:
-----------------------------
<?xml version="1.0" encoding="utf-8"?>
<set xmlns:android="http://schemas.android.com/apk/res/android">


    <alpha android:fromAlpha="1" android:toAlpha="0" android:duration="200"/>


</set>
حالا در قسمت style رفته و یک استایل منحصربفرد برای خودتون ساخته و این اطلاعات رو بهش بدین:
<style name="MyAnimation">
    <item name="android:windowEnterAnimation">@anim/come</item>
    <item name="android:windowExitAnimation">@anim/go</item>
</style>
خب طراحی ما تمام شد حالا باید بریم سراغ نوشتن کدهای جاوا مربوطه به پروژه و وصل کردن اونا به لایه ی ساخته شده.من داخل لایه ی اکتیویتی خودم یک دکمه گذاشتم که با کلیک روی اون دیالوک باز میشه شما میتونین اونو نزارین
Button btShow = (Button)findViewById(R.id.btShow);

    btShow.setOnClickListener(new View.OnClickListener() {
        @Override
        public void onClick(View v) {

            dialog();

        }
    });

}


private void dialog(){
    final Dialog dialog = new Dialog(MainActivity.this);
    //از بین بردن title دیابوگ
    dialog.getWindow().requestFeature(Window.FEATURE_NO_TITLE);
    //از بین بردن بک گراند دیالوگ
    dialog.getWindow().setBackgroundDrawable(new ColorDrawable(android.graphics.Color.TRANSPARENT));
    //معرفی لایه مورد نظر به دیالوگ ساخته شده
    dialog.setContentView(R.layout.alert_dialog);

    //تعریف دکمه ها
    Button btnSetting = (Button)dialog.findViewById(R.id.btnSetting);
    Button btnOK = (Button)dialog.findViewById(R.id.btnOK);

    //تعریف رویداد کلیک
    btnOK.setOnClickListener(new View.OnClickListener() {
        @Override
        public void onClick(View v) {
            dialog.dismiss();
        }
    });
    btnSetting.setOnClickListener(new View.OnClickListener() {
        @Override
        public void onClick(View v) {
            dialog.dismiss();

        }
    });
   //اختصاص دادن استایل مورد نظر به دیالوگ
    dialog.getWindow().getAttributes().windowAnimations = R.style.MyAnimation;

    //نمایش دیالوگ
    dialog.show();


}
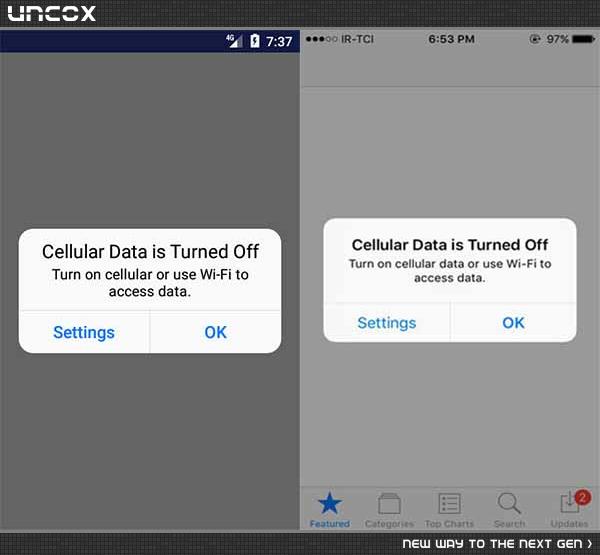
خروجی دیالوگهای آیفون در کنار خروجی برنامه ما (از قصد تمامی نوشته ها رو مثل آیفون نوشتم تا تغییر آنچنانی با هم نداشته باشن)
هنوز پاسخی ثبت نشده است
پاسخگویی و مشاهده پاسخ های این سوال تنها برای اعضای ویژه سایت امکان پذیر است .
چنانچه تمایل دارید به همه بخش ها دسترسی داشته باشید میتوانید از این بخش لایسنس این آموزش را خریداری نمایید .
نظرات