


ویرایش شد...
بروز خطا
[message]
اشتراک در سوال
رای ها
[dataList]
پرسش و پاسخ
استفاده از کتابخونه ParallaxToolbarScrollView (متریال) +نمونه کد+اسکرین شات
مدیریت گفتگو
 android
10 سال پیش
android
10 سال پیش
آخرین تغییر: 9 سال پیش
با سلام
امروز میخوام یه نمونه کد جدید بزارم در مورد کتابخونه Parallax Toolbar ScrollView
Parallax Toolbar ScrollView چی هست؟
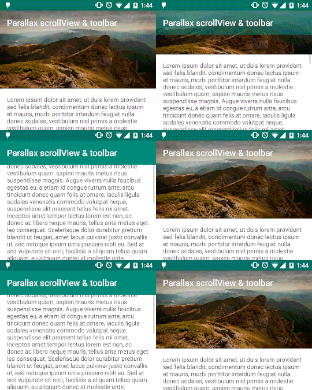
این کتابخونه یکی از کتابخونه های متریال هست که برای جذاب کردن UI برنامه ها استفاده میکنند برای مثال من یه اسکرین برای شما میزارم که اول ببینین کارش چیه...
لطفا نظرات خود را به صورت کامنت بزارید
تکمیل شد...
پاسخها 4
android
10 سال پیش
دوستان عزیز برای استفاده از این اموزش شما باید در مرحله اول اندروید استودیو داشته باشین
خوب حالا یه پروژه ای میسازید و در قسمت build.gradel آن این تیکه کد رو به قسمت dependencies آن اضافه میکنید این کد کتابخونه رو به پروژه اضافه میکنه
compile 'com.github.ksoichiro:android-observablescrollview:+'
و در مرحله بعد شما باید به اینترنت متصل باشید و قند شکن خود را روشن کنید...
وقتی به اینترنت متصل شدید در بالای صفحه build.gradel خود یه دکمه ای به نام sync now رو بزنید و چند لحظه ای صبر کنید تا کتابخونه به پروژه اضافه شود.
در مرحله بعد شما به فایل style.xml خود رفته و این کد ها رو اضافه میکنید به محتوای فایل style.xml
   <style name="AppTheme" parent="Theme.AppCompat.Light.NoActionBar">

        <item name="colorPrimary">@color/ColorPrimary</item>
        <item name="colorPrimaryDark">@color/ColorPrimaryDark</item>
        <!-- Customize your theme here. -->
    </style>
 <style name="Toolbar" parent="Theme.AppCompat">
        <item name="colorPrimary">@color/colorPrimary</item>
        <item name="colorPrimaryDark">@color/colorPrimaryDark</item>
        <item name="colorAccent">@color/colorAccent</item>
    </style>
خوب حالا به فایل string.xml خود رفته و جملات که میخواهید در textview نمایش دهید را وارد کنید من به علت طولانی نشدن اینجا نمینویسم خودتون بنویسد قاعدتا طوری باشه که اسکرول بخوره...
<string name="lipsum"> متن اینجا قرار گیرد</string>
بعد به پوشه dimens.xml رفته و به فایل dimens.xml این تیکه کد رو اضافه کنید این کد برای مقدار دهی height استفاده میشود...
<dimen name="parallax_image_height">200dp</dimen>
تکمیل شد...
نظرات
android
10 سال پیش
حالا یه لایه میسازید به اسم activity_parallaxtoolbarscrollview.xml و این کد ها راضافه میکنید بهش.
 <FrameLayout xmlns:android="http://schemas.android.com/apk/res/android"
    xmlns:app="http://schemas.android.com/apk/res-auto"
    android:layout_width="match_parent"
    android:layout_height="match_parent">

    <com.github.ksoichiro.android.observablescrollview.ObservableScrollView
        android:id="@+id/scroll"
        android:layout_width="match_parent"
        android:layout_height="match_parent"
        android:fillViewport="true">

        <RelativeLayout
            android:layout_width="match_parent"
            android:layout_height="wrap_content">

            <ImageView
                android:id="@+id/image"
                android:layout_width="match_parent"
                android:layout_height="@dimen/parallax_image_height"
                android:scaleType="centerCrop"
                android:src="@drawable/baner" // بنر مورد نظر خود را اینجا قرار دهید
				/>

            <View
                android:id="@+id/anchor"
                android:layout_width="match_parent"
                android:layout_height="@dimen/parallax_image_height"
                android:minHeight="@dimen/parallax_image_height" />

            <TextView
                android:id="@+id/body"
                android:layout_width="match_parent"
                android:layout_height="wrap_content"
                android:layout_below="@id/anchor"
                android:background="@android:color/white"
                android:paddingBottom="@dimen/activity_vertical_margin"
                android:paddingLeft="@dimen/activity_horizontal_margin"
                android:paddingRight="@dimen/activity_horizontal_margin"
                android:paddingTop="@dimen/activity_vertical_margin"
                android:text="@string/lipsum" />
        </RelativeLayout>

    </com.github.ksoichiro.android.observablescrollview.ObservableScrollView>

    <include layout="@layout/gradient_header" />

    <android.support.v7.widget.Toolbar
        android:id="@+id/toolbar"
        android:layout_width="match_parent"
        android:layout_height="wrap_content"
        android:background="?attr/colorPrimary"
        android:minHeight="?attr/actionBarSize"
        app:popupTheme="@style/Theme.AppCompat.Light.DarkActionBar"
        app:theme="@style/Toolbar" />
</FrameLayout>
نظرات
android
10 سال پیش
و در مرحله اخر برای پیاده سازی کد صفحه ای که میخواهیم این parallax برروی آن پیاده سازی شود باید یه فایل جاوا بسازید و اسمش رو بزارید ParallaxToolbarScrollViewActivity و این کد ها اضافه کنید به آن
 import android.os.Bundle;
import android.support.v7.widget.Toolbar;
import android.view.View;

import com.github.ksoichiro.android.observablescrollview.ObservableScrollView;
import com.github.ksoichiro.android.observablescrollview.ObservableScrollViewCallbacks;
import com.github.ksoichiro.android.observablescrollview.ScrollState;
import com.github.ksoichiro.android.observablescrollview.ScrollUtils;

public class ParallaxToolbarScrollViewActivity extends BaseActivity implements ObservableScrollViewCallbacks {

    private View mImageView;
    private View mToolbarView;
    private ObservableScrollView mScrollView;
    private int mParallaxImageHeight;

    @Override
    protected void onCreate(Bundle savedInstanceState) {
        super.onCreate(savedInstanceState);
        setContentView(R.layout.activity_parallaxtoolbarscrollview);

        setSupportActionBar((Toolbar) findViewById(R.id.toolbar));

        mImageView = findViewById(R.id.image);
        mToolbarView = findViewById(R.id.toolbar);
        mToolbarView.setBackgroundColor(ScrollUtils.getColorWithAlpha(0, getResources().getColor(R.color.colorPrimary)));

        mScrollView = (ObservableScrollView) findViewById(R.id.scroll);
        mScrollView.setScrollViewCallbacks(this);

        mParallaxImageHeight = getResources().getDimensionPixelSize(R.dimen.parallax_image_height);
    }

    @Override
    protected void onRestoreInstanceState(Bundle savedInstanceState) {
        super.onRestoreInstanceState(savedInstanceState);
        onScrollChanged(mScrollView.getCurrentScrollY(), false, false);
    }

    @Override
    public void onScrollChanged(int scrollY, boolean firstScroll, boolean dragging) {
        int baseColor = getResources().getColor(R.color.colorPrimary);
        float alpha = Math.min(1, (float) scrollY / mParallaxImageHeight);
        mToolbarView.setBackgroundColor(ScrollUtils.getColorWithAlpha(alpha, baseColor));
       // ViewHelper.setTranslationY(mImageView, scrollY / 2);
    }

    @Override
    public void onDownMotionEvent() {
    }

    @Override
    public void onUpOrCancelMotionEvent(ScrollState scrollState) {
    }
}
پایان
با تشکر
سید حامد حسینی
نظرات
پاسخگویی و مشاهده پاسخ های این سوال تنها برای اعضای ویژه سایت امکان پذیر است .
چنانچه تمایل دارید به همه بخش ها دسترسی داشته باشید میتوانید از این بخش لایسنس این آموزش را خریداری نمایید .
ویرایش
پیام
نظرات